
Reconditioning Shears with a Nail Buffer: A Step-by-Step Guide
Do your shears need a tune-up but you're not quite ready for a full sharpening session? Enter the nail buffer – a simple yet effective tool for reconditioning your shears without the need for drastic measures. In this guide, we'll walk you through the process of using a nail buffer to bring your shears back to life.
1. Assess the Shears Start by assessing the condition of your shears. Are they not cutting as smoothly as they used to? Do they struggle to slice through wet tissue? If so, it's time for some maintenance.
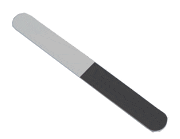
2. Prepare the Nail Buffer Grab a smooth nail buffer with around 3000 grit on one side. This fine grit ensures gentle reconditioning without removing too much metal from the shears. Buy Nail Buffer Here
3. Reconditioning Process
- Begin by following the contours of the convex edge of the shears with the nail buffer.
- Apply gentle pressure, similar to what you'd use on your fingernails.
- Work on both sides of the shears without closing them completely.
- Concentrate on areas that need extra attention, such as the tips where most cutting occurs.
4. Testing After reconditioning, test the shears by cutting dampened tissue. Pay attention to how smoothly they glide through without pulling or snagging.
5. Fine-Tuning If the shears still don't perform optimally, focus on areas that need further attention, such as the tips. Use slightly more pressure while maintaining the same technique.
6. Inspection Inspect the shears closely for any misalignments or irregularities along the cutting edge. Look out for ride lines, which indicate areas that haven't made contact with the sharpening tool.
7. Refinement with Water Stone If necessary, use a water stone with around 2000 grit to address any alignment issues. Apply pressure over the pivot hole while working the cutting edge to ensure even contact.
8. Final Touches Once satisfied with the alignment, go over the shears again with the nail buffer to remove any residual burrs. Clean them off with alcohol to ensure a pristine finish.
9. Testing Again Test the shears one last time, both dry and wet, to ensure they cut smoothly in various conditions.
10. Reassembly and Conclusion Reassemble the shears and rejoice in their newfound sharpness. If you're interested in learning more about sharpening or becoming a professional sharpener, consider reaching out to us at Bonika Shears. We offer training and services to keep your shears in top condition.
By following these steps, you can effectively recondition your shears using a simple nail buffer, prolonging their lifespan and ensuring optimal performance. Happy cutting!